| Author | Message | ||
Susie Campbell Senior Member Username: Susie Post Number: 141 Registered: 10-2002 |
Trimming you Mainsail- Bruce from Ullman Sails sent me this little guide on how to trim my new Main and Genoa. It�s so good that I thought I�d share it with you. HAVE A GREAT TRIP!! SUSIE Use these rules of thumb for mainsail trim as a starting point, then experiment with small changes to see what works best for your boat. Mainsheet and traveler The two most important guides for trimming the mainsail upwind are to keep the boom on the centerline of the boat and the top batten parallel to the to the boom. At this point, the leech telltale at the top batten should flow. If it doesn't, you should twist the sail off more by easing the sheet and pulling the traveler further to windward. More leech tension closes the leech, which allows the boat to point higher. But when you trim past the point of stall, where the top telltale stops flying, the boat will start to slow down. As the boat begins to be overpowered, the traveler should be eased down to reduce weather helm and keep the boat at less than 25 degrees of heel. As the traveler is eased, you will begin to develop backwind. This is not a problem. In puffy wind, the traveler should be played aggressively. Choppy water usually requires a little more twist in the leech than flat water so you should pull the traveler higher and ease the sheet. Outhaul and flattening reef In underpowered conditions upwind, the outhaul should be adjusted to keep the shelf half open. When all crew members are on the weather rail, the shelf should be closed. If you are having to ease the traveler down frequently in the puffs, you should put in the flattening reef. The flattener is a ring in the leech just above the clew. It is independent of the cunningham and will remove a great deal of fullness from the bottom quarter of the sail. It does not have to be entirely taken up, but rather can be tensioned as more flattening is required. Offwind, both outhaul and flattener should be eased to fully open the shelf. Cunningham and halyard Cunningham and main halyard adjust the luff tension which affects the position of draft or maximum fullness in your main. As a general rule, the draft should be 50% aft from the luff. In underpowered conditions, you should have horizontal wrinkles on the luff to allow the draft to stay in its designed position. As the wind increases, the draft will move aft due to mastbend and cloth stretch, so you need to add luff tension to hold it at 50%. As you get overpowered, you should just barely remove the wrinkles. As the wind continues to increase, add cunningham to keep the draft at around 50%. In choppy water, the draft should be a bit further forward (40-45%) for better acceleration. In very flat water and a good breeze, the draft can be allowed to slide aft to 60%. Offwind, be sure to ease the cunningham right off. Backstay In traditional masthead rigs with no running backstays, the permanent backstay controls both mastbend and headstay sag. Mastbend is the primary adjuster of mainsail fullness. As wind increases, so should backstay tension. We strongly recommend a powerful and easy way to use backstay adjuster. If your masthead rig has running backstays, these are used to control mastbend. They also have an effect on headstay sag. At a given permanent backstay tension, more "runner" will straighten the mast (making the main fuller) and remove headstay sag. On a fractional rig, permanent backstay controls mastbend and the runner (attached at the hounds) controls the headstay sag. A fractional rig may also have a checkstay which controls lower mastbend much the way runners on a masthead work. Whatever your rig configuration, you need to make your main flatter as the wind increases. Choppier water requires a bit fuller sail for a given wind strength. You should also mark all adjustments so you can consistently reproduce fast settings. Off the wind, the permanent backstay should be eased right off unless you are power reaching, when about half of full tension should be carried to depower the sail and support the rig. Boom vang If you have a powerful vang, you can use it to induce lower mastbend if you want to flatten the main entry low down. In general, this is not necessary on most big boats. Off the wind, the best rule is to keep the top batten parallel to the boom. Close or beam reaching, you can also watch the top telltale and keep it flowing. On a power reach where you are on the edge of a broach, keep a hand on the vang to dump it off if the rudder feel as though it is stalling. Downwind in big waves and wind, you can help stop oscillation by "overvanging" and hooking the leech. �Trimming your Genoa a Use these rules of thumb for genoa trim as a starting point, then experiment with small changes to see what works best for your boat. Wind ranges Be sure to follow the recommended wind range for your genoa. Using the sail in too strong a wind will not only slow the boat, but also could damage or stretch the sail. If you are unsure what the wind range is for a particular sail, contact your Ullman loft. Sheet tensionThe most important variable is sheet tension. You should develop a relationship between spreader tip and the sail. Choppier water and/or lighter air need more leech twist, so the sheet should be eased slightly. In flatter water, less twist will help pointing ability provided the boat has enough power. A careful eye on the knotmeter or other boats around you will help you determine how tight to sheet. You may also put a telltale on the upper leech to check for stalling. If it doesn't flow, ease the sheet. After tacking, the sheet should be trimmed short of full tension until the boat is up to full speed. In puffy wind, a trimmer should stand by the sheet to adjust it as the wind changes. Also, some communication between the helmsman and the trimmer will help them get the most out of the boat. Genoa lead The genoa lead controls fullness in the bottom third of the sail. It can be thought of as an outhaul for the genoa. The more power needed for choppy water or lighter air, the further forward the lead should be. To set the furthest forward lead, head the boat up and watch to see where the luff backwinds first. It should backwind evenly. The foot should be full and lay almost on the lifeline. This is your powered up setting. As the wind increases, the lead should be moved aft to flatten the foot and depower the top of the sail by allowing it to backwind first. The fore and aft movement can be as much as a foot on a #1 genoa. At the top of its range, the genoa should be trimmed with the foot flat against the shrouds. In choppier water, the lead should be further forward for a given wind strength. In and out placement of the lead is adjusted less often. Track placement determines the innermost lead. Most modern racing boats sheet the #1 genoas at 10 degrees off center in light-moderate air. To extend the upper range of your heavy #1, you can sheet further outboard by using a short sheet run to a second track or the toe rail. #2 genoas are limited by the shrouds and their shorter LP to about 13 degrees off center. But a #3 genoa that can trim in front of the spreaders can be lead as close as 9 degrees in flat water to allow very high pointing. Fore and aft lead movement is more critical and the range is smaller - 3 to 4 inches. Any time you are reaching, the lead should go outboard. When the apparent wind moves aft of about 35 degrees, the lead should go to the rail and further forward. Again, the rule of thumb is to keep the luff backwinding evenly. Headstay sag While the lead controls the fullness in the bottom of the genoa, headstay sag controls fullness in the middle and top. More sag adds fullness, moves the draft forward slightly, and makes the entry rounder. Whenever your boat needs more power, some headstay sag can be beneficial. This occurs typically with the light #1 up. But if you get caught with a sail in wind below its range, sag will help power it up. Be careful not to use so much sag that the headstay bounces in choppy water. As the wind increases, nearing the upper range of your genoa, you should remove as much sag as possible to flatten the sail. How you do this depends on your type of rig. If you have a masthead rig, backstay tension controls sag. But remember that overbending the mast can contribute to sag. This may happen if you have a flexible mast and don't use enough running backstay. In general, the backstay should be well eased in light air (as low as 500 lbs.) and tensioned as wind increases. The maximum backstay tension varies from boat to boat. On a typical 40 footer, it can be as high as 5000 lbs. A typical 30 footer would use about 3000 lbs. On a fractional rig, running backstay controls sag and this adjustment becomes critical, especially in puffy wind. Small changes in runner tension greatly affect headstay sag, so you should have a crew member assigned to this job. As wind drops, the runner should be eased and taken up as wind increases. Halyard tension Halyard tension controls fore and aft position of the maximum fullness of the draft. The draft should be about 40% aft of the luff. In underpowered conditions (usually with the light or all purpose #1), a good rule of thumb is to leave some small horizontal wrinkles at the luff. As the boat gets powered up (10-12 mph apparent wind) you should barely remove the wrinkles. In stronger breeze with the heavy #1, #2, or #3, key on the draft position. More halyard tension holds the draft forward and makes the head slightly fuller. Choppy water requires the draft to be further forward and the entry rounder. This makes the boat easier to steer. In flatter water, the entry can be finer and the draft allowed to slide aft to improve pointing. Always be careful of using too much halyard, especially in puffy wind. Too much luff tension is slower in light air than vice versa. | ||
Ted Lavino Senior Member Username: Tlavino Post Number: 105 Registered: 01-2004 |
Some words from Steve Colgate on Spinnaker Handling: The spinnaker takedown on both large and small boats is very similar; the method used is determined more by wind conditions than by the size of the boat. When lowering the spinnaker to leeward, the only major problem comes from letting it get out from behind the mainsail into strong wind. The crew gathering in the chute gains control of the sail by bringing the sheet forward to a spot just behind the shrouds. The guy is then eased and the halyard lowered, and the sail is pulled in behind the mainsail. However, it is essential that the sheet be in hand and under control before the sail is freed from the guy. Otherwise, the chute will go flying aft and be extremely difficult to capture. On larger sailboats, we first hoist the jib so that the spinnaker is blanketed. Then we lead the lazy sheet to a block well forward near the leeward shrouds and to a winch. We winch the clew of the spinnaker close to the boat before dousing. Then, instead of releasing the guy to run through the pole, the pole is eased to the headstay and lowered to within reach of a crew member who trips the guy. Unlike a jibe when the jaws of the pole are open, release the guy. "Tripping the guy" means to release the tack of the sail by opening the tack shackle. The sheet is released and the lazy sheet on the leeward side of the boat is winched in so the clew is right near the deck behind the mainsail. With it in that position, the crew gathers in the spinnaker as the halyard is lowered quickly, but not so fast that the spinnaker falls in the water. There is a tendency at this point for the lazy sheet to be forgotten or even detached from the corner of the sail. This can be a disastrous mistake. Until the spinnaker is completely on board it can fill with wind or water and be ripped out of the hands of the crew pulling it in. With the lazy sheet attached and cleated, the worst that can happen is that the spinnaker trails in the water along side the boat. But with the lazy sheet taken off, the spinnaker can go out behind the boat held only by the halyard and the sheet (if it, too, hasn't been taken off). This means that the head of the spinnaker will be up in the air filling with wind because the halyard will never be long enough to trail in the water when the spinnaker is out at the end of its sheet. Frankly, the scene produces nightmares, and all because some crew members thought the chute was under control and the lazy sheet could be detached. There may be times when a windward douse is in order. If you are racing and are about to round a mark leaving it to port, but are on the starboard jibe, consider taking the chute down over the windward side. When you jibe to round the mark the spinnaker will be coming down to leeward. Or, if you know you must set the spinnaker again and the next set is on the opposite tack, a windward takedown will prepare you properly for the next set. For example, you are sailing a triangle course with a 90 degree reaching mark turn. You are on the second reach, heading for the leeward mark on the port jibe. The first reach was very tight and the second reach is broad, which indicates the wind has backed (counterclockwise). This means that (after beating back to the weather mark) the run will be on the starboard tack. To be ready for a starboard-tack run, the spinnaker on most boats must be set from the port side of the boat. A normal leeward douse on the second reach will leave the spinnaker on the wrong side for the next set. A memory aid: When the second reach is tight, making it difficult to pull the spinnaker around the jibstay to windward, take down to leeward; when the second reach is more of a run, making it easy to pull the spinnaker to windward, douse to windward. When dousing to windward, take the pole off and stow it just before you intend to douse. Fly the spinnaker without a pole for a short time. Then, as the halyard is lowered, pull the spinnaker around to windward with the guy. In some larger class boats it's hard to do on a reach, but it can be done quite easily on a run. Many smaller boats set and douse the spinnaker to windward as a matter of course. It avoids having a crew member go to the leeward side of the boat to reach for the sheet. The weight to leeward can produce a broach. Two other takedowns are fairly similar: the "forward" takedown and the "string" takedown. For the "forward" takedown, the genoa must be up to create the suction of airflow behind it. The pole is let forward to the headstay and lowered; the sheet is trimmed in tight so the foot of the spinnaker is stretched along the leeward side of the boat and, as the boat rounds the leeward racing mark to go upwind, the spinnaker halyard is thrown off completely. I recommend trailing the spinnaker halyard over the side of the boat so it can't kink as it zings out. Crew stands ready along the foot to gather the spinnaker in and stuff it down the forward hatch. When it's under control, the sheet is released, but the guy is not released or unsnapped until the chute is well aboard and mostly belowdecks. The only difference with the "string" takedown is a retrieving line attached to a patch in the center of the spinnaker that leads under the foot of the genoa to a crew member who pulls it in when the halyard is released. Pulling from the middle of the sail effectively halves the time needed to gather the sail in. | ||
Ted Lavino New member Username: Tlavino Post Number: 3 Registered: 01-2004 |
Excellent resource. I also like "Looking at Sails" by Bruce Banks and Dick Kenny (ISBN 0-914814-21-4) as a great visual resource for logical explanations of trimming all sails, spinnakers included. Note that this book is out of print but may be found on book search engines. | ||
hughston (hughston) |
Extensive spinnaker trim write up follows: I can see that with the file size constraint I have, some of the text is not clear. I'll reload this in a different way later to compensate.  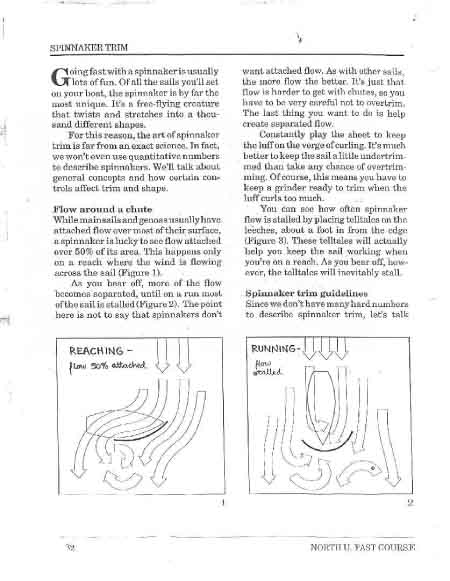 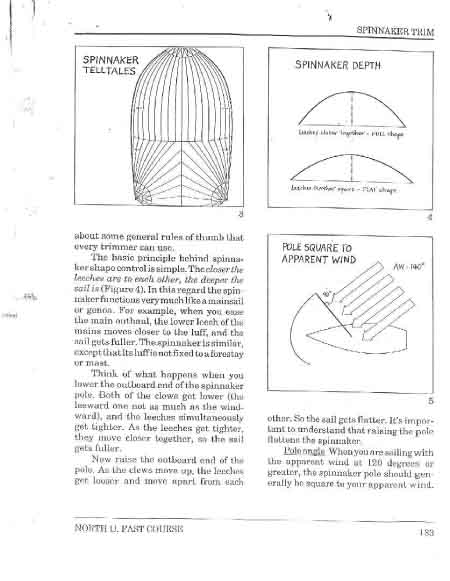 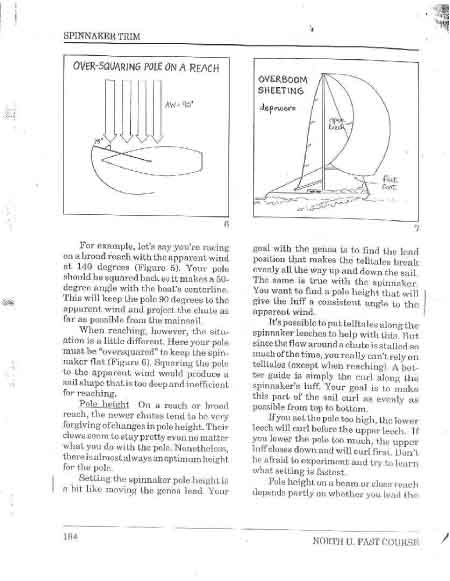  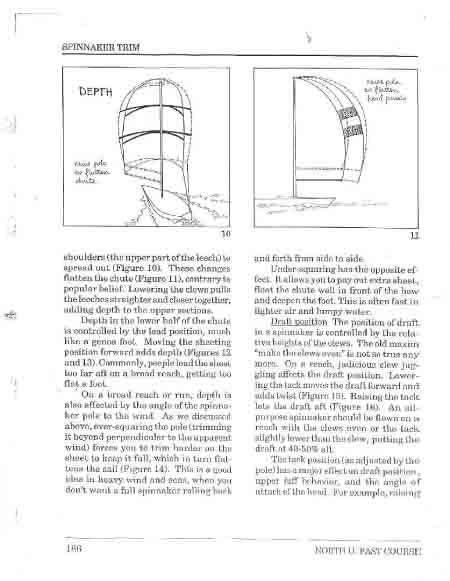 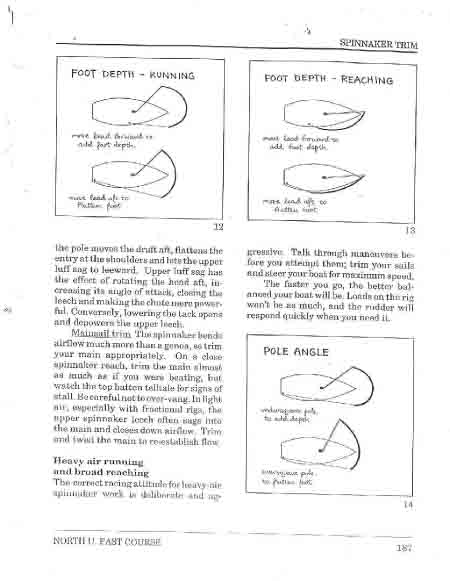 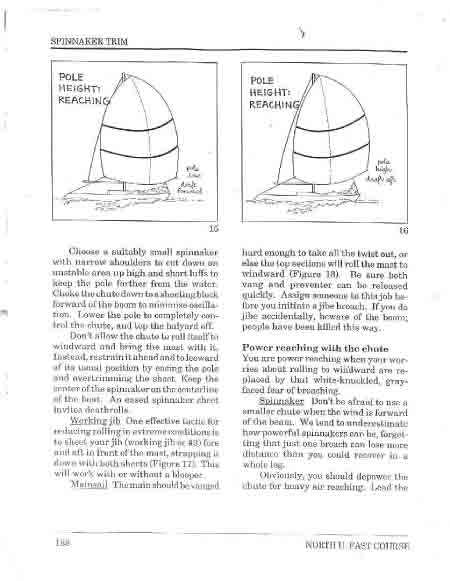 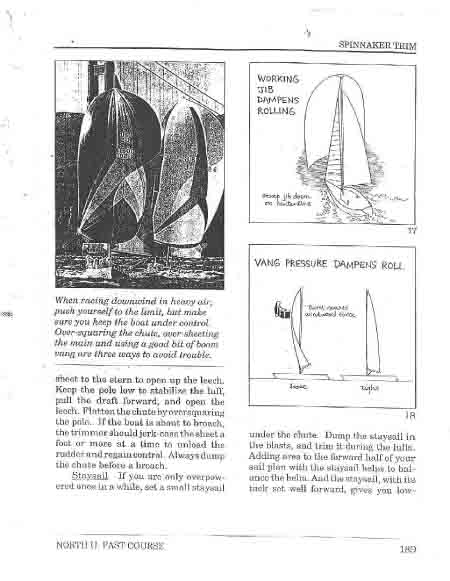 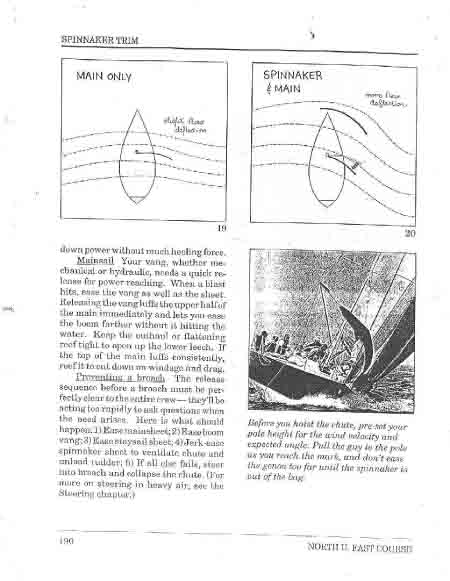 |